
| Channel | Publish Date | Thumbnail & View Count | Download Video |
|---|---|---|---|
 | Publish Date not found | 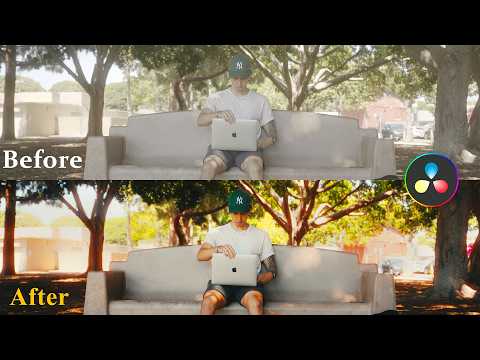 0 Views |
After years of trial and error, I've summarized my two-part color correction process in two videos. (Correction and Gradation) In this video I show you step by step the color correction process I currently use on all my 8-bit Sony video footage.
I'm by no means an expert, I'm just a guy who loves color correction and would like to share his findings in hopes of helping others in their quest for color correction in Davinci Resolve. If you have any tips and tricks you'd like to share, be sure to leave them in the comments below!
Thanks for looking!
Acceleration:
Sony A7C: https://amzn.to/431akwE
Tamron 20-40mm F2.8: https://amzn.to/42WNUNk
Sigma 30mm F1.4: https://amzn.to/4bXXuni
Sony 16-50mm 3.5-5.6
Rode Videomicro: https://amzn.to/3T0W0je
Neewer ZW-02 Boomarm: https://amzn.to/4bTxd9v
K&F Concept 64'' tripod: https://amzn.to/3P1z02A
Zhiyun Molus X100: https://amzn.to/3Tdx0GR
Zhiyun Lantern Softbox: https://amzn.to/3UZRN1Y
Links above are affiliate links
Please take the opportunity to connect and share this video with your friends and family if you find it helpful.


